by Krzysztof Wojdon 2000-2001
1. What is this filter for?
2. Download
3. Configuration dialog box
4. Thanks
5. Good things to come (but not yet, not yet)
6. Changes
7. Author
Appendix.
How does it work?
This filter removes static elements from a video source. Very often such elements are added to live signals to mark the material as someone's property (e.g. a Corporation or TV/Cable Station logo), or just to leave a sign "Jimmy wuz here".
Logos are acceptable, unless:
- You are encoding the signal at a low bitrate. In this case too much of the bitrate is used to encode the logo mark, resulting in a potentially significant loss of video quality.
- Logos are too big and detract from the source material. This is really annoying to encode video with logo wider than 80 pixels or big bright logos on horror-type movies. Once I saw a scene with woman coming down the stairs to the basement - there is no light as in all horrors - strings are playing "suspended death" theme and then woman frightened looks up... boom! What's that? 64x64 pixels big, beautiful, yellow sun. Sun is the mark of one of our local stations.
Download latest (v3.01) Logoaway release - 9 859 bytes.
and documentation for 3.01 (this HTML page) Logoaway 3.0 documentation - 182 106 bytes.
Due to significant changes in source tree, version 3.0 may be unstable, even when using options that worked before.
Download older (v2.4) Logoaway release - 9 859 bytes.
and documentation for 2.4 (this HTML page) Logoaway 2.4 documentation - 182 106 bytes.
Older releases:
Logoaway release 2.3 + docs - 177 210 bytes.
Logoaway 2.3 nodocs - 8 828 bytes.
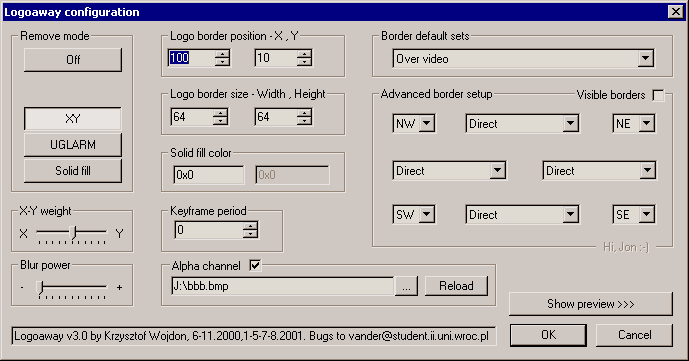
Remove mode

This option selects the method used to interpolate the logo area.
| Filter mode | Description |
| OFF | This mode is used to easily turn the filter on/off. Since you do not have to remove filter from VirtualDub list you do not have to re-set filter parameters again on filter reactivation. |
| UGLARM |
This mode is based on an algorithm designed by Uwe Freese from Germany. UGLARM is an acronym for "Uwe Great LogoAway Remove Mode". Each interpolated pixel is calculated as the sum of the border pixels with weight defined as: border pixels placed further from calculated point are less significant. Here's a pseudo-code example for those who care: for i=0; i borderpixels; i+1 pixel = pixel + borderpixel[i] / ( distance(pixel,borderpixel) ^ blurpower ) Blur power is set with the blur slider. Leftmost value is 1.0 which means that the weight is simple divide by distance, each tick adds 0.3 to blur power. In simpler form: The higher blur, the more the final result depends on the nearest border pixels. Note: UGLARM is sloooow. |
| XY blur | In this mode interpolation is done by interpolating the border pixels horizontally and vertically at the same time.
For you graphic designers out there, imagine a gradient fill from the color of each pixel on the left to the color of it's corresponding pixel on the right, blended with a similar fill from top to bottom. This is the preferred mode which works best in 99% of all cases. |
| Solid color | This mode fills the logo area with a solid color. Color value should be entered as RRGGBB value with hex representations for each color (e.g. FF0000 for maximum red or 000000 for total black). Note: The color of the letterbox area is often not quite black, but a very very dark grey - use a color picker to be sure. This is due to the fact that pure black is not an NTSC safe color.
Contrary to the intended purpose of this filter, Solid mode used with an alpha channel can be used to add a logo :-) but I strongly discourage such use as it will degrade the quality of your encoded video. |
Back to dialog box
X-Y blur weight

An XY blur target pixel is a sum of horizontal & vertical interpolations. This slider selects how much a target pixel is based on horizontal (X) or vertical (Y) interpolation. Left is 100% X and right is 100% Y, and fifty-fifty is in the middle of the slider.
 |
 |
 |
| Only X blended | 50% X + 50% Y blended | Only Y blended |
This setting has no effect in UGLARM or SOLID mode.
Back to dialog box
Blur power

Blur is an optional operation after regular interpolation. This is sets the number of 3x3 convolution iterations. In each iteration all points in the logo area are calculated as:
p(x,y) = [ p(x-1,y-1) + p(x+1,y-1) + p(x-1,y+1) + p(x+1,y+1) + 4*p(x,y) ] / 8
As expected, the more iterations - the smoother the effect. To turn blur off, set the slider all the way to the left (0).
UGLARM mode uses blur in other way, look at
UGLARM description.
Back to dialog box
Logo border position

Set the top-left corner of the logo border. Logo position X & Y must be in range <0,frame width-3>.
Logoaway (since v2.0) is based on logo border selection. That means that corners should be set on the first pixels around the area to remove. In regular mode (all borders in "direct" mode), all pixels inside marked rectangle are overwritten but border pixels are left unchanged.
However, by changing any border to "Interpolated" mode, filter also overwrites those border pixels. For more information about borders read the
border mode section.
Back to dialog box
Logo border size

Width and height of logo border rectangle (incuding the borde edge pixels). Both width and height must be at least 3 because there is no need to mark an null area (border 3x3 marks exactly one pixel).
Back to dialog box
Solid fill color

Enter solid fill color value here. Color value should be entered as RRGGBB value with hex representations for each color component. You can validate that your value was interpreted correctly by the filter in the text caption to the right.
Back to dialog box
Keyframe period

Here you enter an integer N. Every N frames a new logo replacement is calculated. For N=0 a new logo is calculated for each frame. The purpose of this function is to keep the logo replacement unchanged up to the next keyframe to get yet more few bits extra of target bitrate. This setting works best if it corresponds with the Keyframe setting of whatever video codec you use.
Back to dialog box
Border default sets

If you're too lazy to set Advanced border configuration manually here are some predefined border configurations. Selecting one of the available modes sets up Advanced border configuration in a moment.
Back to dialog box
Advanced border setup
This is main upgrade in V2 of Logoaway. Logoaway V1 interpolation worked good as long as logo had all four borders of valid original signal, that is logo fully over video.Then, one day, Jon sent me an email with the description of a Logoaway failure when some of the logo borders were invalid (e.g. logo over letterbox blackborder).
Look here: (click miniature to get full size image)
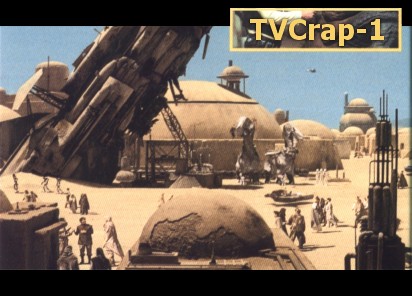
and look what is going on after the old method:
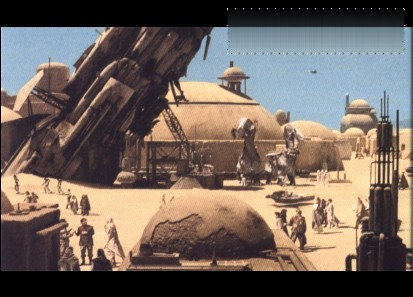
You see? Interpolation from blue sky to black letterbox border gives dark smudge in place of logo. Now, let's select only part of logo over video. Then force top logo border to be recomputed by interpolation. Result:
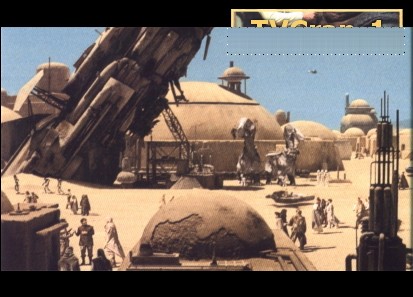
Better? :-) Remaining logo part can be removed with cropping or (if you need letterbox) you can remove the top part with another instance of Logoaway with solid black (or the color of the letterbox area, which is often not quite black, but a very very dark grey - use a color picker to be sure) as fill.
Logo removal procedure is based on the logo borders. In this section you can configure how logo borders are created.
This module contains:
| Visible Borders (switch) | |
| When checked - each border is marked with little dots. This should help you set the logo area more precisely. | |
Back to dialog box
| Border Corners (four selection lists) | |
| These selectors are help the user configure interpolation. After setting border to Interpolate remember to configure interpolation ends with valid values (though default values will do in most cases). For example, setting SE in the upper left corner means use color of the SouthEast corner for the upper left corner. In modes other than "Interpolate", border corner selectors have no effect. |
|
Back to dialog box
| Border Modes (four selection lists) | |||||||||||||||
As mentioned before, logo replacement is based on the logo borders. These selectors help the user set the logo borders. Borders can be created with 3 modes:
|
|||||||||||||||
Back to dialog box
Back to dialog box
Preview
Clicking this button enables real-time preview of video. Using this feature and logo visible border speeds up setting logo parameters. This button is disabled when no video file is loaded into VirtualDub.Back to dialog box
Alpha channel
This is a standard alpha mask feature. Now anyone can mark single pixels in logo or even perform blending between calculated logo replacement and original video.Alpha channel is loaded from a BMP file with 8-bit color depth (256 colors). No compression supported at this time. BMP Palette does not matter, anyone can use favorite color palette (grays, blue-green-yellow-red height map or green scale). There is only one rule: color index 0 - pixel left unchanged, color index 255 - pixel replaced 100%. Medium values results in a blend effect, e.g. 128 = 50% of original video + 50% of calculated value.
 |
 |
 |
| Regular (old) solid mode | + Alpha mask | = Blended result |
GUI
Checkbox enables/disables alpha blending. Turn preview on and play with this button to see the difference.
Edit box contains the path to an alpha bitmap file.
Button
 opens the Windows file browser. Use it to select the BMP file us use as an alpha mask.
 button reloads alpha file again. With frame preview enabled you can update your view after editing the bitmap file.
IMPORTANT NOTES:
- Alpha bitmap must be exactly the same size as selected logo. Maybe in the future I will implement some resize. Currently I am not sure if it is worth it, because anybody can resize alpha mask in a second with any image editing utility.
- As stated before, logo selection is based on
logo border selection. Alpha mask must be exact logo
size, so alpha mask includes also 1 pixel border surrounding
real logo area.
This 1 pixel alpha border is used only if any of the borders is set to INTERPOLATION mode, because interpolated borders are copied to the frame. In other cases borders remain intact so alpha channel 1 pixel border is not used.
- Load video file.
- Use temporal cleaner or temporal smoother filter to make logo as clean as possible. We do not care at the moment about video details, so denoising can be set to full.
- Select frame with best visible logo. Usually black frames for bright logos and vice versa. For bad video signal (eg. logo can be blurred in VHS videos), use frame where it is easiest to see all artefacts related to logo presence.
- Configure Logoaway: turn on visible borders (later, marking pixels will help to cut logo), then select logo area with filter x, y, width, height (real-time preview can be useful).
- Close logoaway configuration dialog. Use VirtualDub function Video/Copy output frame to clipboard (CTRL+2). Go to PaintShopPro. Paste data from clipboard into PSP as new image (CTRL+V).
- Zoom video to see close up of the logo. Mark logo with selection tool. Important: border pixels must be inside marked rectangle. Crop to selection (Shift+R).
- Now we got logo with surrounding border. Add mask with Masks/New/Show all. Turn on masking editing (Masks/Edit).
- Paint with black pen all pixels of the logo. Painted pixels will disappear. Use grays for semi-transparent effect. Pixels removed by accident can be repaired with white pen.
- Copy mask with Edit/Copy function (CTRL+C).
- Paste as New Image (CTRL+V). Now, we got new grayscale (most plain Black-White) mask. Last operation before save is color inversion (Colors/Negative Image).
- Save result as BMP file and load into Logoaway as alpha mask.
Thanks to:
- Uwe Freese and other people for ideas of "blurring". Uwe designed the UGLARM idea.
- Raj Gabrielse for description of the problem of moving logos. From this letter probably scripting ability will be born.
- Jochen Grob located GUI bug. Also found well hidden 1 pixel shift up error. He must have an falcon eye.
- Jon C. Hodgson for detailed notes about Logoaway failure on letterboxed logos. He sent me problem description with a nice images that made problem clear in a minute. And it is true: A picture is worth a thousand words. He also fixed this documentation out of its english-likeness.
- Robert Shahandeh & DrZero for ugly bug detection.
- Uwe "Xan" for BMP reader bug report.
- All people I didn't mention here. Thanks for every letter.
- Scripting
TV stations in my country did their best and imagined parental marks during movies (Oh, boy, these logos are elephant size). I do not want to destroy the entire movie with interpolations, when these logos are visible only half of total play time. So I thought about adding scripting ability to let the filter be ON/OFF for certain frame ranges. Then Raj sent me email about moving logos, so probably position will be scriptable too (and maybe other options?). I am afraid users will be forced to use thier favorite text editor to make scripts :-( Good news is that it will be very simple:
0 off
101 on 200, 20
231 on 200, 140
232 off
will mean
Start with logo turned off, turn on on frame 101 on position 200,20. Between frames 101-231 move logo from 120 pixels down. Then on 232 turn filter off.
- Pixel displacement
In this mode replacing pixel would be make as list of commands "replace pixel at position (x,y) with pixel from position (a,b)". Eg. create displacement table in form of:
(0,0) - (0,0) (1,0) - (0,0) (2,0) - (3,0) that would mean: leave pixel (0,0) unchanged, but replace pixel (1,0) with value of pixel (0,0) and pixel (2,0) with (3,0).
IMHO Some graphical displacement file editor should be created, as no human being would like to make it by hand (logo 32x16 gives 512 such lines).
- Darken/Lighten mode
- Remove still unknown bugs
- 3.02
Pixels inside logo area were incorrectly shifted one pixel up in XY method. Bug well reported by Jochen Grob (thanks, Jochen).
- 3.01
(BUG) BMP reader did not skip padbytes correctly.
Funny thing but there's an error in MSDN in BMP reading sources. :-)
GUI (growing border lists) fix.
Added to DOC short tutorial on using Paint Shop Pro for alpha-mask preparation
- 3.0
Alpha mask feature added
Source cleaned. Adding more modes in future will be very simple.
- 2.4f
UGLARM ugly bug killed
- 2.4
UGLARM mode introduced
- 2.3
Logo blurring. So many people sent me "blur idea" emails, that I put this feature to "urgent" state. :-) Greetings to all of you, who posted ideas (unnamed here, you know who you are).
- 2.2
Preview button. Now you can see logo selection on the frame when setting parameters.
After closing configuration dialog with OK or CANCEL, LA2.0 always changed parameters. CANCEL operation fixed.
Some hacks replaced with official VirtualDub filter manual solutions.
I could not believe, but somehow filter did not work "in-place", but was coping whole frame then replacing small logo area. Brrrr.. fixed.
Various code cleaning
- 2.0
Advanced border setup.
This filter was written by Krzysztof (in english: Christopher) Wojdon and is available under Gnu Public License (GPL) license as it is based on some GPL code by Avery Lee.
You can reach author at krzysiekwojdon@gmail.com.
Mode XY
The idea is very simple - interpolation of logo borders. Each pixel in logo area belongs to some row (R) and column (C). To get new pixel value we interpolate colors in a row R (from west logo edge to east edge - horizontal interpolation) and (vertically from north to south) in column C. If we mark color from R-gradient as Hcolor and from C-gradient Vcolor, then target pixel is sum of X% of Hcolor and Y% of Vcolor. Values X% and Y% are set by user under condition X%+Y%=100%. With a little math:
Hcalc = west_color * distance_from_east + east_color * distance_from_west
Vcalc = north_color * distance_from_south + south_color * distance_from_north
then
target_pixel = Hcalc * X_weight + Vcalc * Y_weight
where distances and weights are <0,1> and for each logo pixel next three equations are true
1 = distance_from_west + distance_from_east
1 = distance_from_north + distance_from_south
1 = X_weight + Y_weight
After this interpolation computed area can be smoothed with common convolution. For each point inside logo rectangle (x,y):
p(x,y) = [ p(x-1,y-1)+p(x+1,y-1)+p(x-1,y+1)+p(x+1,y+1) ] / 4
UGLARM
Here's a pseudo-code example for those who care:
for i=0; i borderpixels; i++
pixel = pixel + borderpixel[i] / ( distance(pixel,borderpixel) ^ blurpower )
pixel = normalize_to_RGB_range( pixel )